Web3 Development With Clojurescript Pt. 1
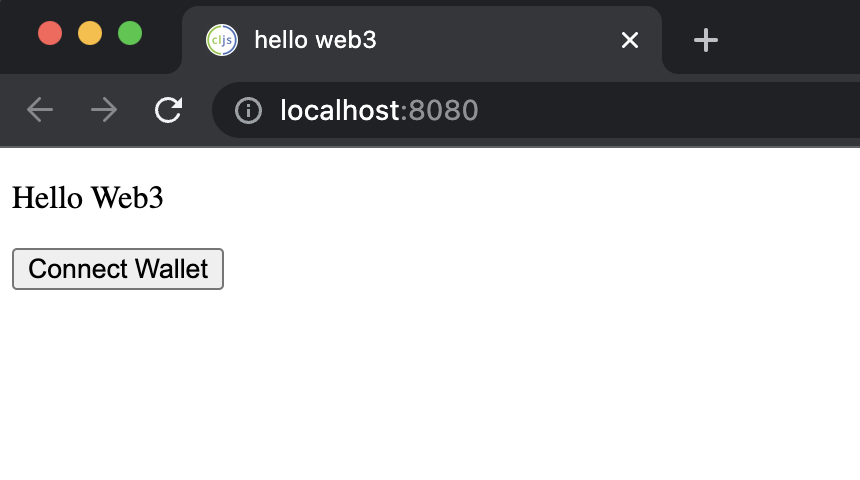
In the first post of this series, we went over setting up a basic Clojurescript project. We wrote a basic component, hello-component, which renders a greeting when we pull up our page. Now we’ll make it greet people by their wallet address. Let’s get started.
Interacting With The Blockchain
We’ll be relying on the user to have a browser with a wallet plugin already installed, for example Metamask in Chrome. We will leverage metamask for all of our Web3 interactions, from querying user details to querying blockchain state. To do so, we will use the Javascript library ethers.js.
Installing ethers.js
Like I mentioned in the previous post, shadow-cljs makes it really easy to use npm packages from Clojurescript. We can install ethers.js with the following command:
npm install --save ethers
Handling Promises
Most of the methods we use to query blockchain info will return Javascript Promise objects. There are a few different ways of working with Promises from Clojurescript. We’re going to leverage a really powerful library called core.async which makes it really easy to handle asynchronous code.
We’ll add core.async to our dependencies in shadow-cljs.edn
...
 :dependencies
 [[reagent "1.1.0"]
  [org.clojure/core.async "1.5.644"]]
...
A Quick Note About State
We won’t dive into the weeds of state management. There’s a lot you can do better than what I’ll show once your application grows in complexity.
In this phase of the tutorial I’m simply trying to illustrate how to talk to the blockchain from Clojurescript and then show this information on the page. We’ll worry about proper state management later.
We’re only going to maintain one piece of state, which is the name by which we greet our user. The initial state is “Web3”, but we will use Ethers.js to replace Web3 with the users’ address, and Reagent to render this address on the page. We’ll be using an atom to hold a string which contains the name we’re using. Reagent provides an atom implementation of their own which adds some features around re-rendering components.
Introducing Mutable State
Until now, our state was fully static. Now we’re going to have a display name that changes when a user connects their wallet.
Rendering Initial State
Let’s create an atom to store this state, and we’ll call it addr. We’ll add the reagent.core import to app.cljsand declare a name for our atom. We’ll pass this atom to our hello-component instead of the string we’re passing now.
(ns helloweb3.frontend.app
  (:require
   [helloweb3.frontend.views :as views]
   [reagent.core :as r]
   [reagent.dom :as rdom]))

(def addr (r/atom "Web3"))

(defn init []
  (rdom/render [views/hello-component addr]
               (-> js/document
                   (.getElementById "root"))))
Instead of passing a string to our hello-component, we’re passing it an atom containing a string. The component will “dereference” the atom and pull out its contents, updating any time it changes.
In views.cljs, we will make a one character change to do this. We will change name to @name. The @ character means “derefernce this atom and give me its value”.
(defn hello-component
  [name]
  [:div
   [:p "Hello " @name]])
Updating State
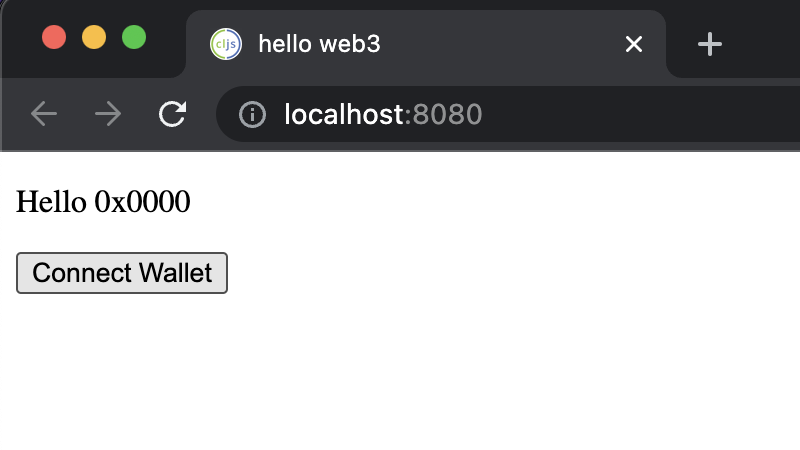
Let’s create a function that changes the value in our addr atom. For now we’ll set it to the dummy value 0x0000. Then, we’ll hook it up to what will become our “Connect Wallet” button.
In app.cljs, define the function get-user-address! below the line where you defined the atom addr. We are using an exclamation point in the function name to convey this function changes state. This is just a convention but its nice to follow.
(defn get-user-address! []
  (reset! addr "0x0000"))
In views.cljs, we’ll define the button component that will set off this function. The component expects a single argument: on-click, which should be a function to be called, uhh… on click lol
(defn connect-wallet-btn
  [on-click]
  [:input {:type "button" :value "Connect Wallet"
           :on-click on-click}])
Then back in app.cljs, we’ll modify our init function. We’re going to change the arguments we pass to render, in order to include the new button. We’ll pass the get-user-address! function to the connect-wallet-btn component so it knows what to do when it’s clicked. Doing so should change the displayed address to 0x0000.
(defn init []
  (rdom/render [:div
                [views/hello-component addr]
                [views/connect-wallet-btn get-user-address! ]]
               (-> js/document
                   (.getElementById "root"))))
Reloading the page we’ll see our cool new button
And clicking it shows our fake address, by updating the value in the atom addr
What We’ve Covered So Far
We’ve gone over a lot! We’re now ready to start actually talking to the blockchain. We’ve seen how to:
- Render data to the user
- Isolate mutable state
- Write a function that updates our state
- Hook up these functions to a UI component (button)
The blockchain aspect of what we’re about to do is pretty simple. We’ll connect to the user’s browser’s metamask extension and request a list of the user’s addresses. Some of the functions we’ll be calling will return Promises, so we’ll learn how core.async gives us some macros to make working with them really easy.
Create a file called web3.cljs alongside app.cljs and views.cljs. In it, we’re going to define a single function, request accounts. This function will be the Clojurescript equivalent of the following Javascript code from the MetaMask docs
window.ethereum.request({ method: 'eth_requestAccounts' });
Put the following code in web3.cljs
(ns helloweb3.frontend.web3
  (:require ["ethers" :as ethers]))

(defn request-accounts []
  ;; returns a promise that resolves to a list of account addresses
  (-> js/window
      .-ethereum
      (.request #js {"method" "eth_requestAccounts"})))
As mentioned in the comment, this function will return a Promise. Rather than handling the complexity in web3.cljs, we’ll simply return the promise and handle the promise in app.cljs.
To do this, we’re going to use two macros from core.async.
go: This lets us fire off a function to be executed asynchronously<p!: This pulls out the value returned by a Promise so we can use it directly
We’re going to need some new imports, and we’ll update get-user-address! to use these macros to query MetaMask for the user’s address.
(ns helloweb3.frontend.app
(:require
[helloweb3.frontend.views :as views]
[helloweb3.frontend.web3 :as web3]
[reagent.core :as r]
[cljs.core.async :refer [go]]
[cljs.core.async.interop :refer-macros [<p!]]
[reagent.dom :as rdom]))
(def addr (r/atom "Web3"))
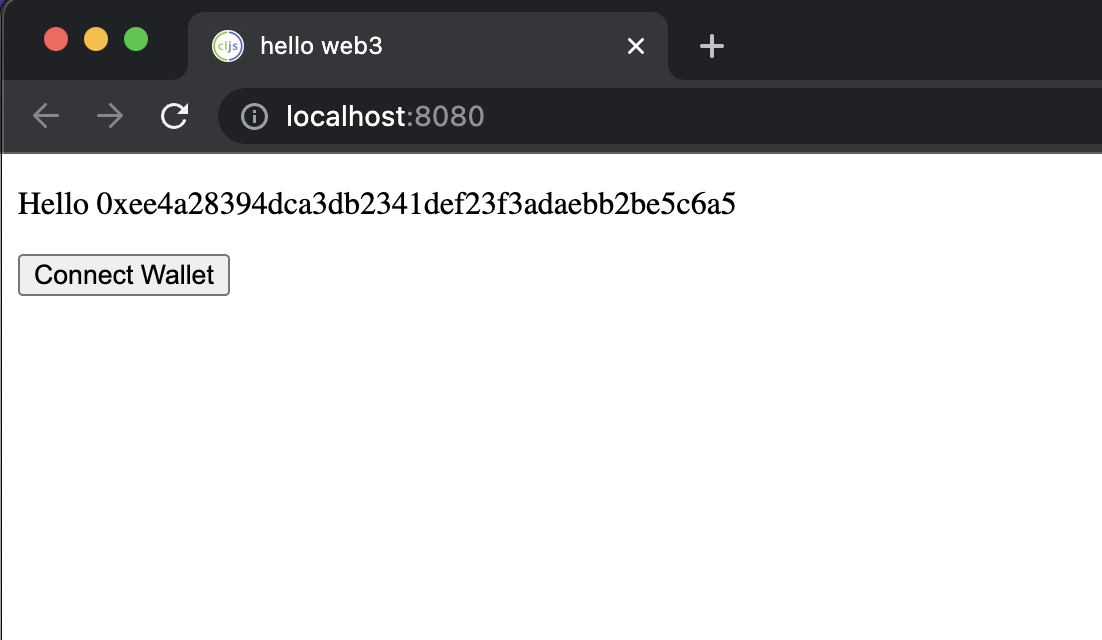
(defn get-user-address! []
(go
(let [[signer-addr] (<p! (web3/request-accounts))]
(reset! addr signer-addr))))
Now we’re firing off a request for the user to connect their wallet when the button gets clicked! If you click the button, and approve the connection in MetaMask, you’ll see your address.
And that’s it! We’ve written clojurescript that queries metamask for a user’s address. Let’s go one step farther: let’s check if the user has an ENS domain set up with Reverse Resolution so we can look up their ENS domain with their address.
From the ENS docs, this is how we would do this in javascript
var address = '0x1234...';
var name = await provider.lookupAddress(address);
// ethers.js automatically checks that the forward resolution matches.
We’ll write a function in web3.cljs that gives us the provider object we need, and then we’ll call lookupAddress on that object with the address we’ve already acquired. If we get a good result, we’ll show that to the user instead of their raw address.
;; web3.cljs
(defn get-provider []
  (new (.-Web3Provider (.-providers ethers)) (.-ethereum js/window)))
Then, in app.cljs, we’ll update get-user-address! to obtain a provider, query for an ENS domain, and then display it if found.
(defn get-user-address! []
  (go
    (let [[signer-addr] (<p! (web3/request-accounts))
          name (<p! (.lookupAddress (web3/get-provider) signer-addr))]
      (if name (reset! addr name) (reset! addr signer-addr)))))
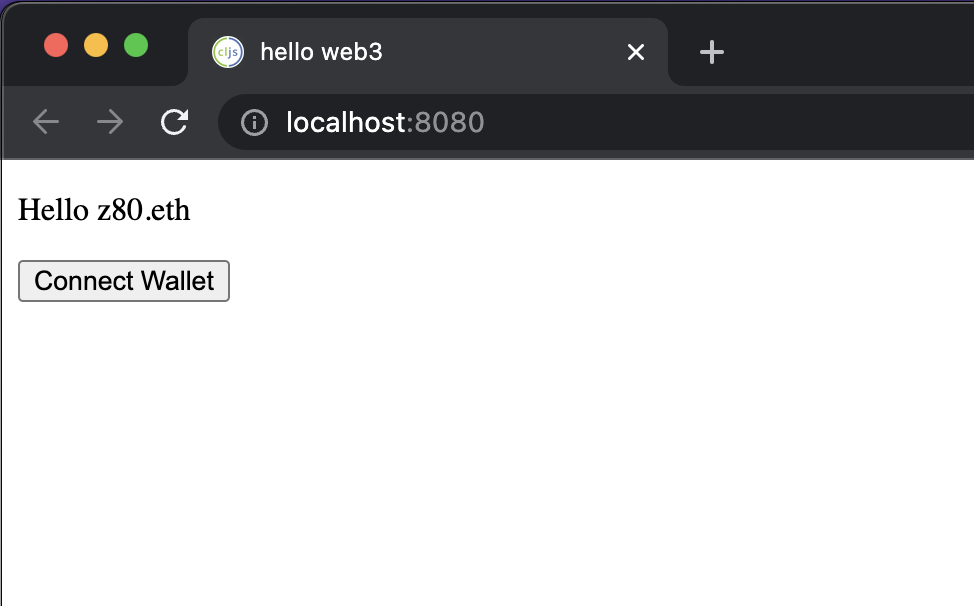
Boom!
In the next posts, we’ll go over querying user balances, token balances, etc. Then we’ll get into some ways to better manage our state as it grows.